
If you came looking for a walk through of how to do your very first miniature, then your already getting ahead of yourself a bit. Painting will definitely come later. Painting miniatures can definitely be a lot more than just grabbing a few colors of paint and a miniature from a store, and getting instant art. There are some things to think about even before you sit down and start slapping paint around.
How Miniatures Are Made
Whether personal creations or produced by a company, miniatures are born from a concept that commonly comes in the form of an illustration and in most cases it starts with a simple pencil and paper sketch. From there, the concept will need to be sculpted into an physical piece. The the sculptor will work from the concept art, and maybe a small write up of a miniature’s background.
Armed with this, a sculptor will then take their preferred materials: Green Stuff, Brown Stuff, wax tools, brass rod and many, many other tools used to create miniatures and their bag of personal tricks to create what is commonly called the “Green”. This term comes from the color of the Green Stuff epoxy putty that sculptors commonly use, though it is no longer the exclusive material of choice by sculptors. Greens often take several weeks or more to complete, depending on the complexity and size of a piece, with input given along the way to insure the Greens meet the creator’s needs.
Once the Greens are complete, they are inspected and readied for “Masters”. Masters are castings made from the original greens and intended to be used in creating the production molds for all of the miniatures shipped off to your local store. The production molds are a 2 part mold found in the shape of a ring. This mold is placed in a spinning device, where molten pewter is poured into and spun at high speeds so the pewter reaches all crevices of the mold. Then a miniature’s parts are separated, sorted and packed for shipping. Keep in mind, additional fine details and factors go into this whole process, but we’ll save those for another day.
Why do you want to paint
For the most part, painting miniatures is a hobby, and more often than not, many do so because we want to have a good looking army in a game of WARMACHINE or other war games. One thing that most people don’t realize until they are knee deep into this hobby is time spent on painting. Most spend way more time painting these miniature than they do playing with them in a game.
This obviously differs person to person, but you’ll quickly find out just how much time is spent on the hobby painting, filing, priming, and more than the time spent on the gaming table as a whole. Some paint just to paint and never even play a game, some paint a few here and there for their RPG adventures and spend lots of time on just a few pieces. This seem obvious enough to veterans, but as a new painter it’s better to establish why one wants to paint which helps to better answer a few questions later on.
Materials and Steps to Create Miniatures
When you first start getting into the hobby of painting miniatures, you’ll quickly find yourself grabbing all kinds of other items off the shelves necessary to finish even your first piece. Lets see if we can getting a better grasp of what’s needed to keep from making multiple trips to the local game & hobby store.
Needle Files
One of the first things you will need to start prepping your miniatures are needle files. These are small thin files meant for working on metal found in all kinds of shapes and sizes. They can be purchased individually or in sets. Often the sets are a much better deal per file, but if you want to buy individual files, get a few different shapes as they very useful. Three common shapes are the round file, triangle file, and two-sided flat/crescent file. To see the shape look down from the tip where you will see the shape. Keep in mind this in mind when buying files, the tighter and finer tooth pattern the better. Pewter is a fairly brittle metal and will not clog these files and the finer tooth, the better as it leaves a finer finish.
Pinning Tools
After filing, a lot people like to pin their miniatures when they come in multiple parts. While not totally necessary, this can fortify the construction of your work. All that is really required to do this is a pin vise, a fine drill bit and some pinning material. Pin vises while a little slower than a power drill, is much more safe and less likely to snap a fine drill bit, as this tends to happen way to often with a power drill.
If you decide to use a power drill, do so at its slowest speed possible to reduce the chance of a mishap. One other word of advice on this matter, Dremels are not a good idea when drilling into pewter, even at a Dremels slowest speed, it can still create enough heat from friction and quickly bind the bit and snap it off in a heart beat. Do yourself a favor and avoid the Dremel when drilling.
Assembly and Paint
In order to assemble your parts, glue is a must. Most types of cyanoacrylate glue should work, but the brand “Zap-A-Gap” is a common favorite. Avoid “Super Glue” as its bonding ability to pewter is not that great.
Primer is something all miniature painters learn to have a love-hate relationship with eventually. Primer comes in several colors: white, black, grey and red oxide are the most common, with the first two being the colors that are predominantly utilized. There are a lot of brands to choose from, but Krylon for white, grey, and red oxide or Dupli-color for white, black, grey and red oxide are great places to start out at. For a little more depth on primer, check out the white primer and black primer articles.
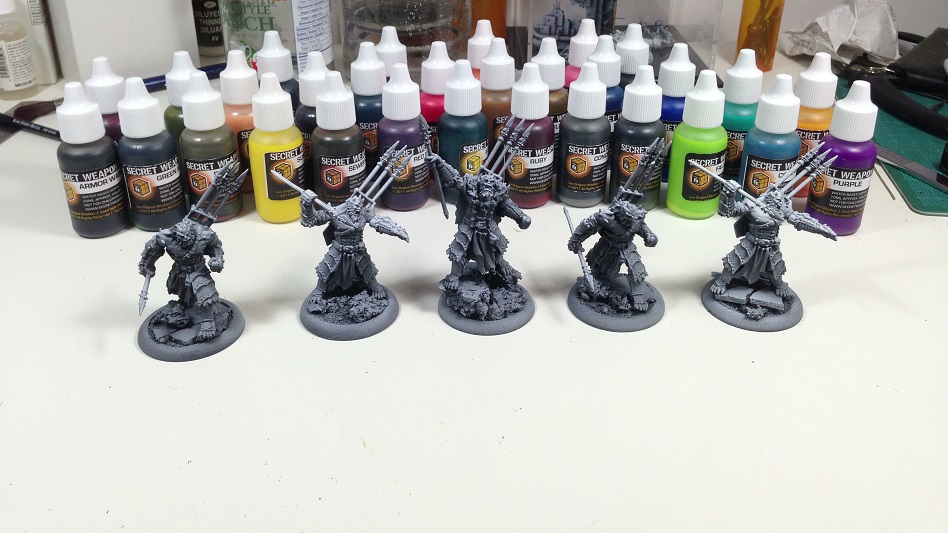
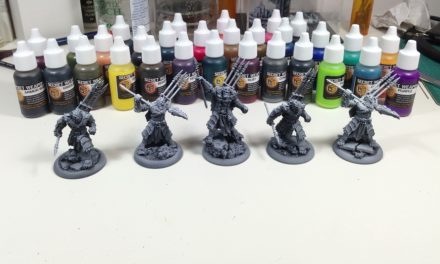
Paints are a very common subject when first starting out. Try going to a decent hobby shop anytime and check out their paint aisle. First thing we need to tackle is paint type. There are several, but if you find yourself around anyone that has painted miniatures, you’ll quickly find acrylics are the way to go. They are water soluble, dry quickly, have a huge color range capability and brand names intermix well. Another thing to keep in mind for miniature paint lines, they often have a finer pigment grain than other model paint lines and therefore are kinder to your learning curve when painting. Commonly found miniature paint brands are Vallejo, Reaper, Games Workshop and Foundry. Several of these brands have multiple lines.
Color Palettes
When you finally decide on grabbing a few colors, consider a few things: budget, color scheme and personal drive on painting. Figuring out your color scheme ahead of any paint buying can help you narrow down your paint purchases. It’s worth a little forethought so that you don’t have several jars of paint sitting around unused. Over time you can slowly grow your paint collection with a few here and there, it tends to not hit your wallet nearly as hard when doing so. One habit I’ve built up that has saved me a lot of time and heart ache is to keep track of your color scheme and builds. Actually writing the first, second and so on colors that you used to build up a specific area, that way when you come back to, your units and jacks all have a consistent look and feel when it comes to colors.
Paint Brushes and Finishing Work
Brushes are the obvious next step after paint, as they tend to work a lot better than your fingers. I shop for brushes at local art supply stores as I can find a larger assortment and much better prices than at hobby shops. A few factors are brush shape, size and bristle type. Brush shapes are all too numerous to list here, but the most commonly used in miniature painting are rounds, which are very versatile and dependable.
Occasionally you will see a few flat and liner brushes being used for some more specialized applications. Sizes are often personal taste, I tend to use a #1, #2 and a #4. The #4 is something I used on large surfaces of jacks, and the #2 I tend to use on about 80% of the other surfaces, while a liner I will only use for fine details. The big thing a lot of people seem to over look on slightly larger brushes is the amount of paint they can hold, when compared to a 10×0 brush. While detail is still maintained with a #2, the extra paint it can hold allows for smoother application and requires you to go back to your paint less.
Bristle types are a little less confusing, as they all tend to lean towards white and red sable brushes, with Kolinsky red sable being one of the favored high end brushes. White sable tend to be a good all around brush, as they can be found for a few bucks, have a good response for the beginning painter and tend to take abuse well.
Palettes can be over looked during your first supply trip. A simple plastic or ceramic cup palette found at hobby or art stores, a large ceramic tile from a home improvement store, or even a smooth piece of thick paper can cover the needs, depending on your preference.
Basing material is another often overlooked item during your first trip, but can be as simple as sand, hobby store bought ballast and static grass, or even some premixed basing material at your local game store. For a more serious look into basing, try our basics of basing tutorial.
After finishing up your miniature, sealing it off with a clear coat will help protect all your hard work for many games to come. The ones I suggest looking into are Testors Dull coat, Krylon’s matte spray, and Games Workshop’s matte spray.
Setup a Dedicated Work-space
Ideally, a permanent place to put your miniatures and paints is good, but not always possible when you’re first starting out. An option is to create or find a usable painting tray and a container for your paints. This way you’re not always wasting time getting everything in and out of storage as much and in turn, not wasting valuable painting time.
A useful idea is a TV tray that can slide out of the way when not in use. One simple but extremely useful tip is to place a thin tightly woven cloth over your work while in storage, as this prevents dust from settling on your work and mixing in with your painting surface when you pick them up next time. A pillow case or bed sheet works great.
Lighting
Lighting is another item you’ll quickly realize is important once you sit down to paint for the first time. I use 3 light sources when painting. One room light, and two close up arm lights that have 5000 kelvin lights bulbs in them. Kelvin is a measurement of light temperature and 5000 kelvin is understood as an industry standard as a common day light measurement. While a 5000 kelvin light will help you see colors better on your miniature and not have them distorted as your bring them into other light sources.
The primary reason most rely on these extra lights is eye strain. After long hours of painting under these lights I have become very spoiled and when I go somewhere else to paint, quickly realize how much painting under a common yellow hued household light bulb can strain your eyes. Having at least two light sources is a good idea, with only one light source close in, you will create shadows on your painting surface and this will make it difficult when painting. With two light sources hitting from opposite sides of your painting subject, you will flood the area enough with light to better see your subject matter.
Work Surface and Seating
Your table surface, chair and posture are something to seriously consider. If you’re only painting for a half an hour at a time then you may not notice, but try painting for an hour or two bent over. It is never a pleasant experience. It seems obvious enough, but worth a thought before you sit down to paint, not after you have sent your back into spasm mode.
I have a chair and table set up, where I can sit upright, with my forearms against the table and my work directly in front of me without bending over. Honestly I look like I’m in preschool with the table way too high, but it actually works well for me during those long stretches at the painting table.
Work Habits and Organization
I’ll be the first to admit I’m a bit of a control freak when it comes to my painting table, yeah it may look like an atomic bomb went off on the thing on a good day, but I can easily reach across my table blind folded for a color of paint and be within an inch of where its at. Point is, build up good work habits, while items are placed everywhere, the table is still clean, and organized to where I know of every things placement.
Little things like washing your hands before painting miniatures because your skin naturally creates oils which isn’t a good thing when you are working with a water based paint, since oil and water don’t mix. All it takes is one greasy print to make that next layer impossible to lay down properly.
This leads us into how to simply hold your miniature to avoid excessive handling of the primed surface and rubbing it off. Most people tend to hold their miniatures from the attached base, some even take it a step further and use an old paint jar and adhere it via blue tack or some other tacking substance to the miniature, giving their hands something to hold onto and reducing the stress on their hands. My personal take on this is to work from pins attached to the miniatures and hold onto them via forceps. I few minutes is all it takes to figure out a personal means of easily holding onto metal as you paint.
Another important tip is using two containers for water, one for normal paint and the other for metallic. The metal flake found in metallic paint is notorious for getting into your brushes and paints no matter how much you rinse or wash them out. I even go as far as having a separate set of brushes for metallic paints so I don’t have to worry about doing the faces of a few grunts, only to come back and see some metal flake on their cheeks and reminding me of glitter makeup every time I pick them up.
Finding a Workflow
Time spent and work habits differ for me when you take in consideration the painting of a solo/caster or rank and file troopers. With troppers, I will do a single miniature to figure out the scheme, but after that, I’m a firm believer in doing a squad in an assembly line process as this reduces time spent mixing paints, reduces the wasted paint in my palette and often when doing a few of the same spots several times, I seem to learn how to do each area more fluid and get better as I go.
While it is good to pay attention to detail and make sure your paint job is the best it can be, also balance your time with your output. Something I have heard more than a few times with new painters on a new army is frustration when they never get anything done. The assembly line does increase productivity when you are painting, but if you bite off more than you can chew, often frustration sets in and you never want to fully spend time on what you have already started.
Starting off with six simple one piece miniatures is a good assembly line start up, and maybe less if there are multiple parts, say a single Warjack. Its good for morale to see progression and accomplishment, which in turn will inspire you to push forward with more later on. Once done with a unit or Warjack, I then tend to dive into a caster or solo, as I have put my color scheme through the initial run and figured out how it will flow, and possibly adjusted it slightly to better encompass my initial color idea.
With single miniatures like a Warcaster I tend to spend a fair amount of time on, as they are the leaders of your force, and are often looked at much more and inspected a lot closer than any common trooper ever would be. I am always a little more liberal with my color scheme on casters with only a few spots of the color scheme being applied so that they stand out visually from the rest of the army. Once I finally dive into my caster mini, I also tend to start up on areas that are not so noticeable, as I find painting like anything else, it takes a little bit of doing to reach full stride. I tend to save high detailed areas and the face for until I’ve found my groove in painting as these areas are always things that people look at first.
Final Thoughts Before You Start
One final word of advice I like to pass on to the beginning painter, save your first miniatures and resist stripping anything! As you continue to paint, your painting will continue to grow. Nothing reinforces this more, than looking back at something you painted six months ago. No matter how much you have painted, I always see people looking back at what they painted and tearing their work to bits on how it can be better when compared to what they are doing currently. So do yourself a favor and start this habit early.

